| FAQ | Member List | Albums | Today's Posts | Search |
| Welcome Guest. ( logon | register ) | |||||
| ||||||
|
|
| Topic Tools | Message Format |
| Author |
| ||
| ttaleric Date registered: Dec 1899 Location: Vehicle(s): | Install Pictures! Post pictures of your custom installs!! | ||
| #14 |
| ||
| Author |
| ||
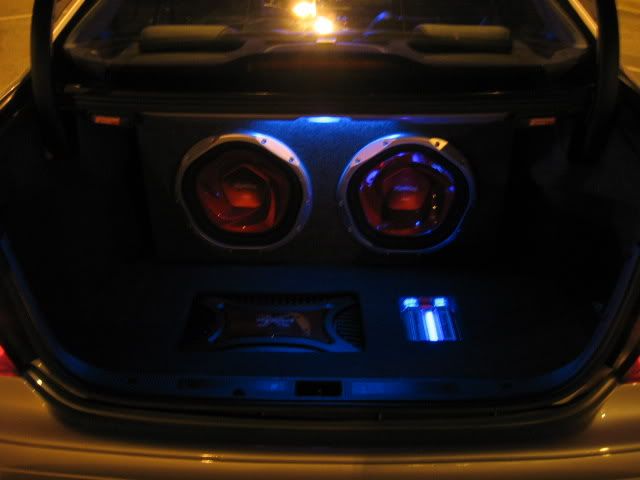
| ThrillKill Date registered: Dec 1899 Location: Vehicle(s): | RE: Install Pictures!
2005 ML MCS Retrofit-Sony Explod 1200W amp-2x12" Sony Explod 1100W subs-2 Farad Power Acoustik cap Edited by ThrillKill 4/21/2006 12:17 PM | ||
| #24 - in reply to #14 |
| ||
| Author |
| ||
| ttaleric Date registered: Dec 1899 Location: Vehicle(s): | RE: Install Pictures!
| ||
| #45 - in reply to #14 |
| ||
| Author |
| ||
| ttaleric Date registered: Dec 1899 Location: Vehicle(s): | Re: Install Pictures! Considering I cannot see these, i am guessing that it did not work.. | ||
| #47 - in reply to #14 |
| ||
| Author |
| ||
| Administrator Date registered: Dec 1899 Location: Vehicle(s): | Re: Install Pictures! ttaleric - 4/21/2006 4:30 PM Considering I cannot see these, i am guessing that it did not work.. I seem em fine  | ||
| #57 - in reply to #47 |
| ||
| Author |
| ||
| ThrillKill Date registered: Dec 1899 Location: Vehicle(s): | RE: Install Pictures! A bit compressed horizontally | ||
| #70 - in reply to #14 |
| ||
| Author |
| ||
| ttaleric Date registered: Dec 1899 Location: Vehicle(s): | RE: Install Pictures! Yeah sorry about that, these pics are in high res, so it is tough to break them down. Once i get some time ill post some better pics... Again sorry. | ||
| #75 - in reply to #14 |
| ||
| Author |
| ||
| jtbeche Date registered: Dec 1899 Location: Vehicle(s): | RE: Install Pictures! Ok......I've had my stuff installed for a long time now but all I did at first was just throw it in there thinking I'd make it look better later. Well later came and went and I still haven't done it. So, any suggestions on making it look better or more stealth but still keeping the trunk functional? (DSC01070.JPG) (DSC01071.JPG) Attachments ----------------  DSC01070.JPG (83KB - 1 downloads) DSC01071.JPG (83KB - 1 downloads) DSC01070.JPG (83KB - 1 downloads) DSC01071.JPG (83KB - 1 downloads) | ||
| #94 - in reply to #75 |
| ||
| Author |
| ||
| ThrillKill Date registered: Dec 1899 Location: Vehicle(s): | RE: Install Pictures! I had your same dilemma. Since it's my daily driver, I need to get at the spare and battery in an emergency. I used 2" builders foam sheeting and traced out the dimensions using the trunk mat, my amp and cap then cut out that portion with a jigsaw. I also hollowed out a channel underneath for the wire run, and covered everything with gray flannel using spray adhesive. Where the cd deck is and on the opposite side I cut and made hinges with duct tape under the flannel so it would fit without having to bend it. I lose 2" of trunk height but it isn't really noticeable. If I have to get at the trunk stuff, I just pull out the sub box and lift off the foam panel. I'm going to cover all with Plexiglas this week, just trying to figure out ventilation. (kitandsub007.jpg) Attachments ---------------- kitandsub007.jpg (33KB - 0 downloads) | ||
| #184 - in reply to #14 |
| ||
| Author |
| ||
| jtbeche Date registered: Dec 1899 Location: Vehicle(s): | RE: Install Pictures! Hmmmmmm......yeah, I read what you did a long time ago. Just another of the many reasons I need to meet up with you someday and take a look at your work. I may have to have you build me one of those.  | ||
| #189 - in reply to #184 |
| ||
| Author |
| ||
| ttaleric Date registered: Dec 1899 Location: Vehicle(s): | Re: Install Pictures! You guys need to switch to Fiberglass!! I am going to write a how-to soon... | ||
| #200 - in reply to #189 |
| ||
| Author |
| ||
| iNeon Date registered: Dec 1899 Location: Vehicle(s): | RE: Install Pictures! I don't know if I ever got around to this you-know-where, but here ya'll go-- A cheap Aiwa deck, 2x4.25 pioneer 2-way in the front, 2x5.5(?) pioneer 2-way in the rear(had to re-engineer the back dash, was 2 speakers from factory) and a thrift store subwoofer(5 dollars!) in a box I built to replace the first-aid kit in the rear window. Can any of ya'll help me to design a better one out of MDF? I want it to be shorter, this one sounds OK, but I am not fond of how large it is, I know it will sound better in a solid box with a port instead of the plexi crap I built  You may notice how fond I am of cheap shit heh heh (console.jpg) (rearshelf.jpg) (subwoofer.jpg) (sub.jpg) (box.jpg) (amp.jpg) (alldone.jpg) Attachments ---------------- console.jpg (53KB - 4 downloads) rearshelf.jpg (77KB - 1 downloads) subwoofer.jpg (19KB - 3 downloads) sub.jpg (57KB - 3 downloads) box.jpg (16KB - 2 downloads) amp.jpg (48KB - 3 downloads) alldone.jpg (71KB - 5 downloads) | ||
| #218 - in reply to #14 |
| ||
| Author |
| ||
| ttaleric Date registered: Dec 1899 Location: Vehicle(s): | Re: Install Pictures! I like what you did with the dash, might be an awia, but it looks good. Where would you want to put the box? It wouldnt be that hard to think of a design for one. Tons of designs are all over the net! | ||
| #251 - in reply to #218 |
| ||
| Author |
| ||
| iNeon Date registered: Dec 1899 Location: Vehicle(s): | Re: Install Pictures! I tried to make the grain follow the factory bits initially, but the veneer was not long enough. I did save enough bits of this direction to strip/recover another set of dashpieces in the vertical grain pattern that would better match in color as well, but finding an uncracked blue dash is presenting a big problem! There is no way I could take this dash off and not hurt it more! I digress... wait, I can just make a new post! | ||
| #273 - in reply to #14 |
| ||
| Author |
| ||
| samhmbz Date registered: Dec 1899 Location: Vehicle(s): | RE: Install Pictures! Everything is factory equip. custom mount of IPOD in ashtray instead of glove box,all options phone with vc,sat. radio w/ 2nd gen antenna, nav,changer and IPOD. Sam Edited by samhmbz 4/23/2006 5:26 PM (completecompressd.JPG) (complete 2 compressed.JPG) Attachments ---------------- completecompressd.JPG (68KB - 7 downloads) complete 2 compressed.JPG (61KB - 5 downloads) | ||
| #507 - in reply to #14 |
| ||
| Author |
| ||
| NZ Benz Expert Date registered: Apr 2006 Location: New Zealand Vehicle(s): 1993 300SEL/S320 Posts: 2555  | Re: Install Pictures! ttaleric - 4/22/2006 5:55 PM I like what you did with the dash, might be an awia, but it looks good. Where would you want to put the box? It wouldnt be that hard to think of a design for one. Tons of designs are all over the net! Did yiu know that Awia is made by Sony?  | ||
| #7978 - in reply to #251 |
| ||
| Author |
| ||
| ttaleric Date registered: Dec 1899 Location: Vehicle(s): | Re: Install Pictures! NZ read what he said the specs were... Cheap Awia deck. | ||
| #7988 - in reply to #7978 |
| ||
| Author |
| ||
| firstmb Date registered: Dec 1899 Location: Vehicle(s): | Re: Install Pictures! Looks Good, you guys have lot of time on hand or/and lot of extra money.. | ||
| #8128 - in reply to #14 |
| ||
| Author |
| ||
| Prana25 Date registered: Dec 1899 Location: Vehicle(s): | RE: Install Pictures! This is my 2nd install. If you have some input, I'd appreciate it. Head Unit: Eclipse CD8445 (no, I don’t care about DVD) Front Speakers: Diamond Audio S600s HEX Components Rear Fill Speakers: Diamond Audio D361 Components (Connected via RAF on front crossover) Front Amp: Diamond Audio D6600.4 (300w x 2 @ 4 Ohm) Sub Amp: Diamond Audio D61000.1 Single 12” Sub: Diamond Audio D912D2 * Sub installed in box designed by Diamond. Debating on fiberglass - trade off SQ for space? Wiring: Street Wires ZN650 (for both main signals and sub) Cap: Street Wires PSC201 0 Gauge from Battery to Distribution – broken down to 4 Gauge to Amps Replaced all speaker wire with Street Wires (don’t remember model – best avail) Dynamat Extreme throughout trunk, rear qtr panels and roof. Still applying where needed (Head Unit.jpg) (Amps 1.jpg) (Amps 2.jpg) (Sub.jpg) Attachments ---------------- Head Unit.jpg (316KB - 4 downloads) Amps 1.jpg (323KB - 2 downloads) Amps 2.jpg (320KB - 4 downloads) Sub.jpg (310KB - 2 downloads) | ||
| #37396 - in reply to #14 |
| ||
| « View previous thread :: View next thread » |
|
|